How to create a CI / CD pipeline for EKS using GitHub Actions and Argo CD: Part 1
Introduction
This article has two parts. In the first part, we will create a Continous Integration (CI) pipeline using GitHub actions whereas, in the second part, we will look into using ArgoCD to deploy our applications automatically in Kubernetes.
Check out the earlier articles in this series if you are interested:
How to set up an AWS EKS cluster with the AWS Load Balancer Controller using Pulumi
How to build and deploy a Python application on EKS using Pulumi
Prerequisites
- Pulumi: We will be using Pulumi to provision our infrastructure
- A running Elastic Kubernetes Service (EKS) cluster with AWS Load Balancer Controller
- An Elastic Container Registry (ECR) repo for storing docker images
We cover both of these steps in the previous articles linked above.
Setup Python web application repo
For this tutorial, we will set up a simple Python web application which can be found at https://github.com/abhishekray07/python-web-app.
This Python app returns Hello, world! whenever a request is made.
What is Continuous Integration?
Continuous Integration (CI) is a software practice where code is committed frequently to a shared repository. It is also good practice to continuously build and test any of the code which is committed to the repository.
For this tutorial, we will focus on building a docker image for our application and pushing it to AWS Elastic Container Registry (ECR) whenever new code is committed to our repository.

How to set up a CI pipeline on GitHub?
The first thing we will do is to create an AWS IAM user and give it permissions to our ECR repo.
Creating an IAM user
We will be using Pulumi to create an IAM user with the appropriate permissions. We will be creating the following resources:
- An IAM user called
github-user - IAM policies that allow ECR authorization and access
# IAM user that will be used in GitHub actions
github_iam_user = aws.iam.User(
    "github-user",
    name="github-user",
    tags={
        "purpose": "Account used in Github actions to push docker images to ECR"
    }
)

# ECR authorization policy to authenticate with ECR
github_ecr_authorization_policy = aws.iam.Policy(
    "github-ecr-auth-policy",
    policy="""{
        "Version":"2012-10-17",
        "Statement":[
            {
                "Sid":"GetAuthorizationToken",
                "Effect":"Allow",
                "Action":[
                    "ecr:GetAuthorizationToken"
                ],
                "Resource":"*"
            }
        ]
    }"""
)

# ECR policy to get and push images to repo we created earlier
github_ecr_policy = aws.iam.Policy(
    "github-ecr-policy",
    policy=pulumi.Output.all(ecr_repo.arn).apply(
        lambda args:json.dumps(
            {
                "Version":"2012-10-17",
                "Statement":[
                    {
                        "Sid":"AllowPush",
                        "Effect":"Allow",
                        "Action":[
                            "ecr:GetDownloadUrlForLayer",
                            "ecr:BatchGetImage",
                            "ecr:BatchCheckLayerAvailability",
                            "ecr:PutImage",
                            "ecr:InitiateLayerUpload",
                            "ecr:UploadLayerPart",
                            "ecr:CompleteLayerUpload"
                        ],
                        "Resource": args[0]
                    }
                ]
            }
        )
    ),
)

# Attach created policies to the IAM user
aws.iam.UserPolicyAttachment(
    "github-user-auth-ecr-policy-attachment",
    policy_arn=github_ecr_authorization_policy.arn,
    user=github_iam_user.name,
)

aws.iam.UserPolicyAttachment(
    "github-user-ecr-policy-attachment",
    policy_arn=github_ecr_policy.arn,
    user=github_iam_user.name,
)
Let’s run pulumi preview to see if our code works as expected. This is the output that we get after running the command:
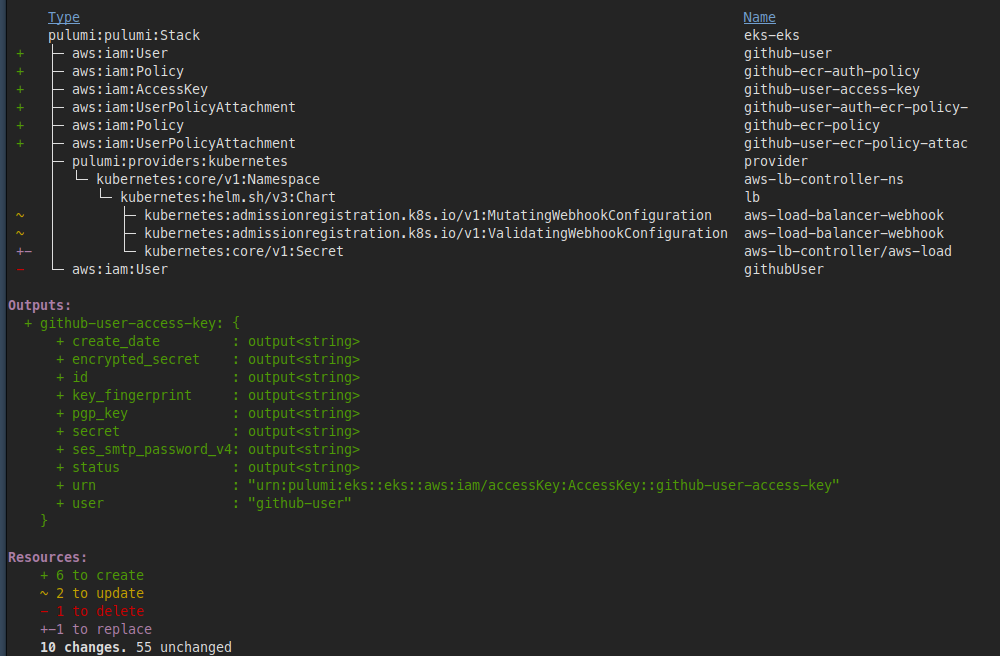
Next, we’ll run pulumi up to create these resources. The IAM user should be created with the appropriate permissions once the command finishes running.
Creating Access Keys
We will be using the AWS CLI to create Access Keys for the IAM user. We will be using these credentials for setting up our CI pipeline in GitHub.
To create Access Keys run the following command:
aws iam create-access-key --user-name github-user

{
    "AccessKey": {
        "UserName": "github-user",
        "AccessKeyId": "xxxx",
        "Status": "Active",
        "SecretAccessKey": "xxxx",
        "CreateDate": "2021-06-26T03:50:28+00:00"
    }
}
Store the AccessKeyId and SecretAccessKey carefully as we will need these in the next step.
Creating Secrets on GitHub
We will use the access keys that we created in the previous step and store them as Secrets in our repository. These secrets allow us to store sensitive data and access them as environment variables in GitHub Actions.
To create secrets, first, click on the Settings tab and then click on Secrets on the left sidebar.

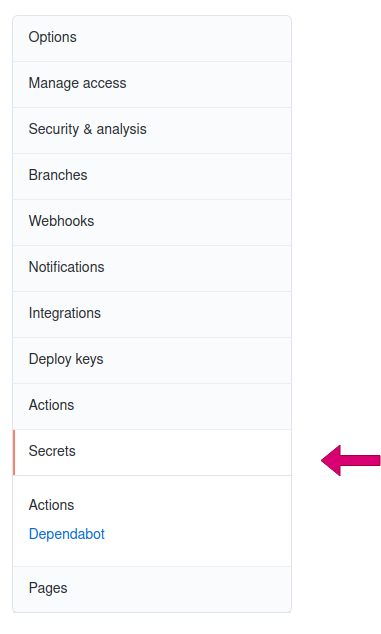
We will create the following secrets:
- AWS_ACCESS_KEY_ID: The value for this secret should correspond to the
AccessKeyIdfrom the user credentials in the previous step - AWS_SECRET_ACCESS_KEY: The value for this secret should correspond to the
SecretAccessKeyfrom the user credentials in the previous step - REPO_NAME: This is the name of the ECR repo that we want to store the docker images in
Build & Push Docker images using GitHub Actions
We will be using GitHub Actions to trigger a workflow whenever a new commit is made to the repository. The workflow is composed of the following steps:
- Checking out the latest commit
- Configuring AWS Credentials using the secrets we added
- Logging in to ECR
- Building, tagging, and pushing a docker image
Let’s create a new file called ci-cd-pipeline.yml under the .github/workflows directory with the following contents and commit them to your repository:
on:
  push:
    branches: [ main ]
  pull_request:
    branches: [ main ]

name: Build and push a docker image

jobs:
  deploy:
    name: Deploy
    runs-on: ubuntu-latest

    steps:
    - name: Checkout
      uses: actions/checkout@v2

    - name: Configure AWS credentials
      uses: aws-actions/configure-aws-credentials@v1
      with:
        aws-access-key-id: $
        aws-secret-access-key: $
        aws-region: us-west-2

    - name: Login to Amazon ECR
      id: login-ecr
      uses: aws-actions/amazon-ecr-login@v1

    - name: Build, tag, and push the image to Amazon ECR
      id: build-image
      env:
        ECR_REGISTRY: $
        ECR_REPOSITORY: $
        IMAGE_TAG: $
      run: |
        # Build a docker container and push it to ECR
        docker build -t $ECR_REGISTRY/$ECR_REPOSITORY:$IMAGE_TAG .
        echo "Pushing image to ECR..."
        docker push $ECR_REGISTRY/$ECR_REPOSITORY:$IMAGE_TAG
        echo "::set-output name=image::$ECR_REGISTRY/$ECR_REPOSITORY:$IMAGE_TAG"
Running the CI Pipeline
Now that we have our GitHub Actions workflow committed to the repository, we can go ahead and trigger the workflow.
First, click on the Actions menu from the navigation.

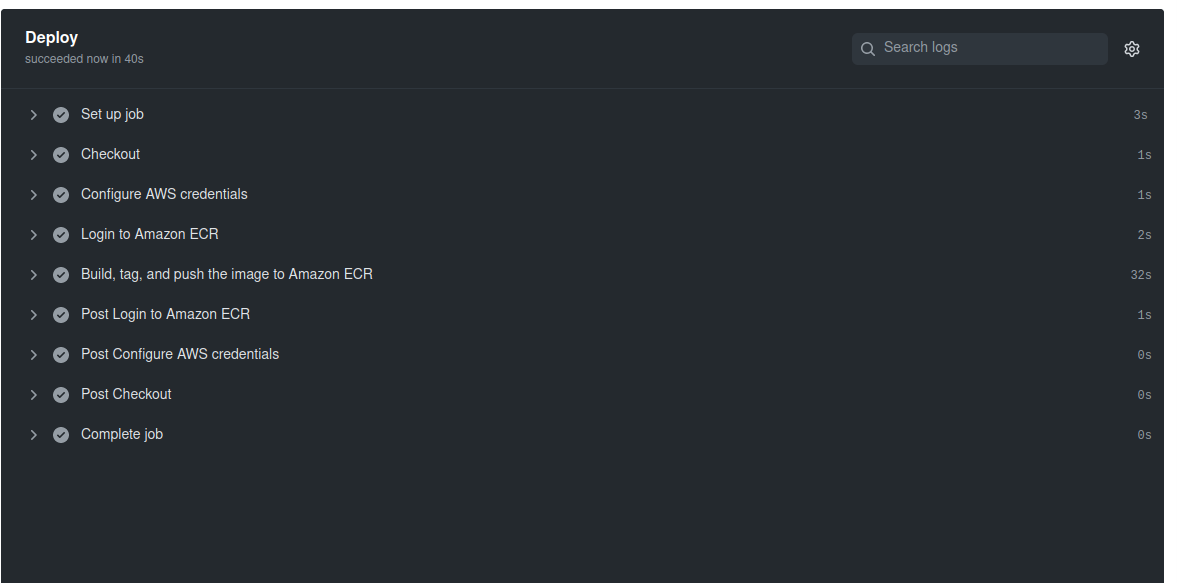
On the Actions page, you will see that there a new workflow was triggered as a result of the new commit.

Let’s click on that workflow to see what’s happening. You should be able to track the progress of your workflow. Once the workflow finishes, we can see the status of each step and whether it succeeded.
Once the workflow finishes, we can go to the AWS console and verify that a new image is available.

Conclusion
In this article, we saw how to create a CI pipeline for our Kubernetes cluster using GitHub Actions. In the next article, we will see how to integrate ArgoCD to continuously deploy the new image that was built to our Kubernetes application.