How to setup an AWS EKS cluster with the AWS Load Balancer Controller using Pulumi
Table of contents
- Introduction
- Prerequisites
- Setting up an EKS Cluster
- AWS Load Balancer Controller
- Deploying an Application
- Cleaning up the stack
Introduction
Pulumi is an Infrastructure as code platform that lets you create, deploy and manage AWS resources using a programming language like Python. Pulumi supports multiple cloud providers as well multiple different programming languages.
Pulumi is similar to Terraform which is also a popular Infrastructure-as-code platform. A major difference between Pulumi and Terraform is that Pulumi lets you choose one of the support general-purpose programming languages whereas Terraform has a domain-specific language called Hashicorp Configuration Language (HCL).
In this tutorial we are going to try and do the following:
- Use Pulumi with Python to setup our Infrastructure
- Setup an AWS EKS cluster
- Enable the AWS Load Balancer Controller
- Deploy a simple application to the EKS cluster that is publically accessible over the internet
Prerequisites
Setting up an EKS Cluster
We will be using Pulumi’s EKS cluster component to bootstrap a new EKS cluster. The resources we need to create for an EKS cluster are:
- A new VPC for the EKS cluster
- 2 public Subnets. We also need to add certain tags to these subnets to ensure the AWS Load Balancer controller works as expected.
- Attach the newly created public subnets to a Route Table that is accessible via an Internet Gateway
- We will also enable the OIDC provider on the cluster. An OIDC provider is required to attach an IAM role to a service account. We need to enable this to ensure that the AWS Load Balancer controller works as expected.
The code for creating a new EKS cluster will be as follows:
import pulumi
import pulumi_eks as eks
import pulumi_aws as aws
import pulumi_kubernetes as k8s

cluster_name = "eks-tutorial-cluster"
cluster_tag = f"kubernetes.io/cluster/{cluster_name}"

public_subnet_cidrs = ["172.31.0.0/20", "172.31.48.0/20"]

# Use 2 AZs for our cluster
avail_zones = ["us-west-2a", "us-west-2b"]

# Create VPC for EKS Cluster
vpc = aws.ec2.Vpc(
	"eks-vpc",
	cidr_block="172.31.0.0/16"
)

igw = aws.ec2.InternetGateway(
	"eks-igw",
	vpc_id=vpc.id,
)

route_table = aws.ec2.RouteTable(
	"eks-route-table",
	vpc_id=vpc.id,
	routes=[
		{
			"cidr_block": "0.0.0.0/0",
			"gateway_id": igw.id
		}
	]
)

public_subnet_ids = []

# Create public subnets that will be used for the AWS Load Balancer Controller
for zone, public_subnet_cidr  in zip(avail_zones, public_subnet_cidrs):
    public_subnet = aws.ec2.Subnet(
        f"eks-public-subnet-{zone}",
        assign_ipv6_address_on_creation=False,
        vpc_id=vpc.id,
        map_public_ip_on_launch=True,
        cidr_block=public_subnet_cidr,
        availability_zone=zone,
        tags={
	     			# Custom tags for subnets
            "Name": f"eks-public-subnet-{zone}",
            cluster_tag: "owned",
            "kubernetes.io/role/elb": "1",
        }
    )

    aws.ec2.RouteTableAssociation(
        f"eks-public-rta-{zone}",
        route_table_id=route_table.id,
        subnet_id=public_subnet.id,
    )
    public_subnet_ids.append(public_subnet.id)

# Create an EKS cluster.
cluster = eks.Cluster(
    cluster_name,
		name=cluster_name,
    vpc_id=vpc.id,
    instance_type="t2.medium",
    desired_capacity=2,
    min_size=1,
    max_size=2,
    provider_credential_opts=kube_config_opts,
    public_subnet_ids=public_subnet_ids,
    create_oidc_provider=True,
)

# Export the cluster's kubeconfig.
pulumi.export("kubeconfig", cluster.kubeconfig)
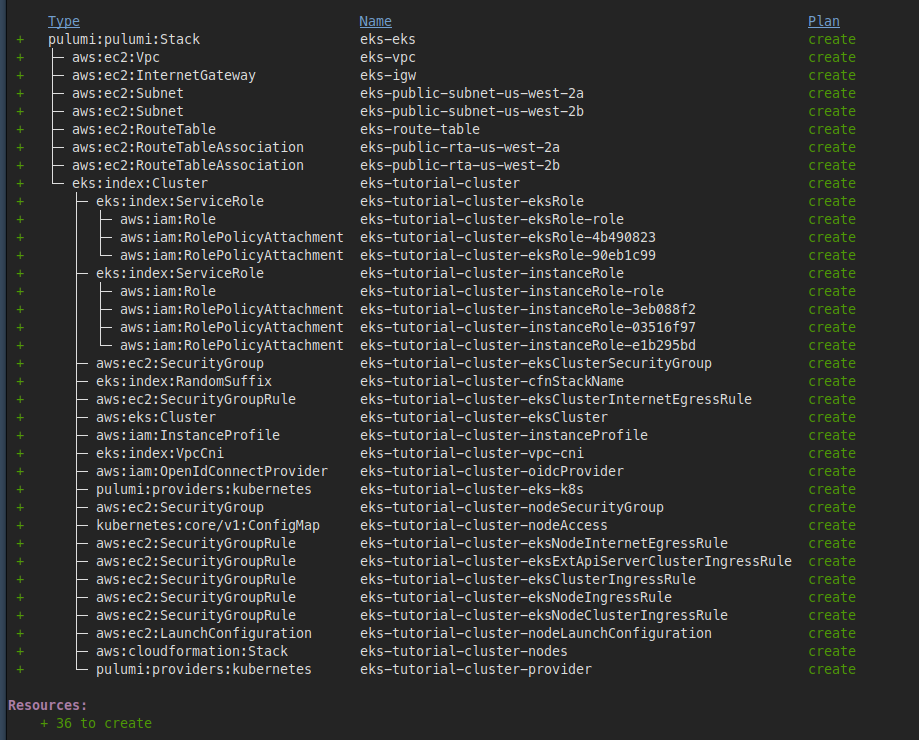
Let’s run pulumi preview to ensure the code works as expected. The output shows all the resources that will be created as part of the cluster.
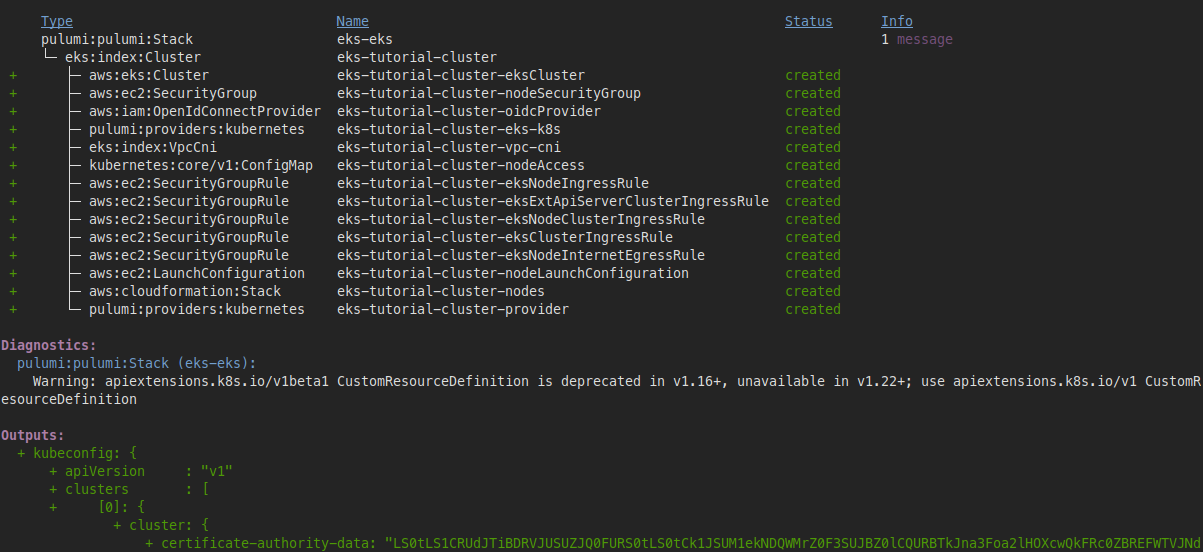
Next, we will run pulumi up to create these resources. This step can take 10-15 minutes to finish. Once the cluster is set up successfully, you should see output like this:
Next, let’s try to connect to this Kubernetes cluster. We will save the Kubeconfig that we exported as part of the cluster creation to our local kubernetes config.
pulumi stack output kubeconfig > ~/.kube/config
Run the following command to ensure you can connect to the cluster:
kubectl get nodes

NAME                                          STATUS   ROLES    AGE     VERSION
ip-172-31-4-233.us-west-2.compute.internal    Ready    <none>   4m34s   v1.19.6-eks-49a6c0
ip-172-31-52-180.us-west-2.compute.internal   Ready    <none>   4m29s   v1.19.6-eks-49a6c0
Awesome, now that our EKS cluster up and running, let’s look into setting up the AWS Load Balancer Controller.
AWS Load Balancer Controller
AWS Load Balancer Controller is an open-source controller that helps manage AWS Elastic Load Balancers for a Kubernetes cluster. The controller has the following capabilities:
- Provisions an Application Load Balancer (ALB) when used with a Kubernetes
Ingressresource. - Provisions a Network Load Balancer (NLB) when with a Kubernetes
Serviceresource of typeLoadBalancer.
We will be provisioning an Application Load Balancer using the Ingress resource for this tutorial.
Let’s first download this IAM Policy. This policy needs to be attached to the EKS worker nodes so that these nodes have the proper permissions to communicate with the Amazon Load Balancers.
mkdir files
curl -L https://raw.githubusercontent.com/kubernetes-sigs/aws-load-balancer-controller/main/docs/install/iam_policy.json -o files/
iam_policy.json
We will be creating the following resources to enable the AWS Load Balancer Controller:
- Creating a service account for the AWS Load Balancer Controller. We will use the OIDC provider that we created with the cluster to attach an IAM role to this service account
- We will create an IAM role using the policy we downloaded earlier.
- We also leverage Pulumi’s Kubernetes abstractions to create a Namespace and ServiceAccount for the AWS Load Balancer Controller.
- Lastly, we will use a Helm Chart to deploy the AWS Load Balancer controller in the namespace we just created above. Some of the configuration options required are specified here.
import json

aws_lb_ns = "aws-lb-controller"
service_account_name = f"system:serviceaccount:{aws_lb_ns}:aws-lb-controller-serviceaccount"
oidc_arn = cluster.core.oidc_provider.arn
oidc_url = cluster.core.oidc_provider.url

# Create IAM role for AWS LB controller service account
iam_role = aws.iam.Role(
    "aws-loadbalancer-controller-role",
    assume_role_policy=pulumi.Output.all(oidc_arn, oidc_url).apply(
        lambda args: json.dumps(
            {
                "Version": "2012-10-17",
                "Statement": [
                    {
                        "Effect": "Allow",
                        "Principal": {
                            "Federated": args[0],
                        },
                        "Action": "sts:AssumeRoleWithWebIdentity",
                        "Condition": {
                            "StringEquals": {f"{args[1]}:sub": service_account_name},
                        },
                    }
                ],
            }
        )
    ),
)

with open("files/iam_policy.json") as policy_file:
    policy_doc = policy_file.read()

iam_policy = aws.iam.Policy(
    "aws-loadbalancer-controller-policy",
    policy=policy_doc,
    opts=pulumi.ResourceOptions(parent=iam_role),
)

# Attach IAM Policy to IAM Role
aws.iam.PolicyAttachment(
    "aws-loadbalancer-controller-attachment",
    policy_arn=iam_policy.arn,
    roles=[iam_role.name],
    opts=pulumi.ResourceOptions(parent=iam_role),
)

provider = k8s.Provider("provider", kubeconfig=cluster.kubeconfig)

namespace = k8s.core.v1.Namespace(
    f"{aws_lb_ns}-ns",
    metadata={
        "name": aws_lb_ns,
        "labels": {
            "app.kubernetes.io/name": "aws-load-balancer-controller",
        }
    },
    opts=pulumi.ResourceOptions(
        provider=provider,
        parent=provider,
    )
)

service_account = k8s.core.v1.ServiceAccount(
    "aws-lb-controller-sa",
    metadata={
        "name": "aws-lb-controller-serviceaccount",
        "namespace": namespace.metadata["name"],
        "annotations": {
            "eks.amazonaws.com/role-arn": iam_role.arn.apply(lambda arn: arn)
        }
    }
)

# This transformation is needed to remove the status field from the CRD
# otherwise the Chart fails to deploy
def remove_status(obj, opts):
    if obj["kind"] == "CustomResourceDefinition":
        del obj["status"]

k8s.helm.v3.Chart(
    "lb", k8s.helm.v3.ChartOpts(
        chart="aws-load-balancer-controller",
        version="1.2.0",
        fetch_opts=k8s.helm.v3.FetchOpts(
            repo="https://aws.github.io/eks-charts"
        ),
        namespace=namespace.metadata["name"],
        values={
            "region": "us-west-2",
            "serviceAccount": {
                "name": "aws-lb-controller-serviceaccount",
                "create": False,
            },
            "vpcId": cluster.eks_cluster.vpc_config.vpc_id,
            "clusterName": cluster.eks_cluster.name,
            "podLabels": {
                "stack": pulumi.get_stack(),
                "app": "aws-lb-controller"
            }
        },
        transformations=[remove_status]
    ), pulumi.ResourceOptions(
        provider=provider, parent=namespace
    )
)
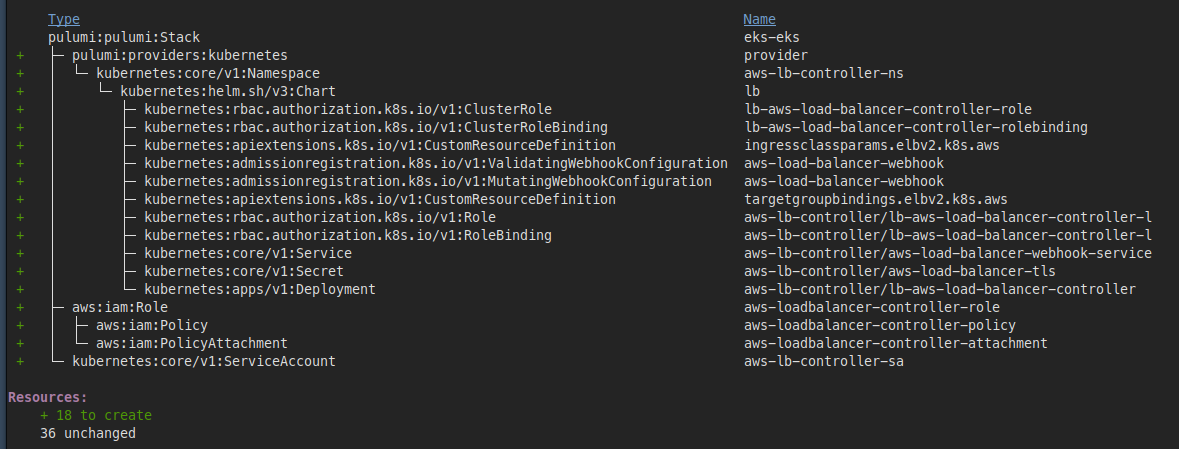
Let’s run pulumi preview again to confirm that the code compiles. The following resources will be created:
Next, we will run pulumi up to create the resources. Once the command completes, let’s check if the AWS Load Balancer Controller works as expected.
First, let’s check if the new namespace aws-lb-controller got created:
kubectl get namespaces
NAME                STATUS   AGE
aws-lb-controller   Active   92s
default             Active   27m
kube-node-lease     Active   27m
kube-public         Active   27m
kube-system         Active   27m
Next, let’s check which pods are running in that namespace:
kubectl get pods -n aws-lb-controller
NAME                                               READY   STATUS    RESTARTS   AGE
lb-aws-load-balancer-controller-5c7d8455d8-p5mv5   1/1     Running   0          2m8s
lb-aws-load-balancer-controller-5c7d8455d8-vv2s8   1/1     Running   0          2m8s
We can also take a look at the logs to ensure the controller is working as expected:
kubectl logs -f lb-aws-load-balancer-controller-5c7d8455d8-p5mv5 -n aws-lb-controller

....
{"level":"info","ts":1624336520.6160986,"logger":"controller","msg":"Starting Controller","reconcilerGroup":"elbv2.k8s.aws","reconcilerKind":"TargetGroupBinding","controller":"targetGroupBinding"}
{"level":"info","ts":1624336520.6161547,"logger":"controller","msg":"Starting workers","reconcilerGroup":"elbv2.k8s.aws","reconcilerKind":"TargetGroupBinding","controller":"targetGroupBinding","worker count":3}
{"level":"info","ts":1624336520.616967,"logger":"controller","msg":"Starting EventSource","controller":"ingress","source":"kind source: /, Kind="}
{"level":"info","ts":1624336520.6170182,"logger":"controller","msg":"Starting Controller","controller":"ingress"}
{"level":"info","ts":1624336520.617047,"logger":"controller","msg":"Starting workers","controller":"ingress","worker count":3}
It looks like our AWS Load Balancer Controller is working as expected. Now, let’s run a simple application to ensure everything works as expected.
Deploying an Application
We will deploy an Nginx application to our EKS cluster and make it available to the internet.
Let’s go ahead and create a Kubernetes manifest called nginx-service.yaml. We will create a Namespace, a Service as well as a Deployment resource in this manifest as follows:
apiVersion: v1
kind: Namespace
metadata:
  name: eks-tutorial
---
apiVersion: v1
kind: Service
metadata:
  name: nginx-service
  namespace: eks-tutorial
  labels:
    app: nginx-app
spec:
  selector:
    app: nginx-app
  type: NodePort
  ports:
    - protocol: TCP
      port: 80
      targetPort: 80
---
apiVersion: apps/v1
kind: Deployment
metadata:
  name: nginx-deployment
  namespace: eks-tutorial
  labels:
    app: nginx-app
spec:
  replicas: 3
  selector:
    matchLabels:
      app: nginx-app
  template:
    metadata:
      labels:
        app: nginx-app
    spec:
      containers:
      - name: nginx
        image: public.ecr.aws/z9d2n7e1/nginx:1.19.5
        ports:
        - containerPort: 80
Let’s apply the manifest to create our resources:
kubectl apply -f sample-service.yaml

namespace/eks-tutorial created
service/nginx-service created
deployment.apps/nginx-deployment created
We can confirm our service got deployed correctly by checking if the pods came up:
kubectl get pods -n eks-tutorial

NAME                               READY   STATUS    RESTARTS   AGE
nginx-deployment-c89b8fb47-jmdvh   1/1     Running   0          27s
nginx-deployment-c89b8fb47-lpnbk   1/1     Running   0          27s
nginx-deployment-c89b8fb47-x287x   1/1     Running   0          27s
Next, we will set up the Ingress resource that will enable our Kubernetes Service to be accessible via the public internet. The annotations on the Ingress resource are important since that determines if an ALB resource will be set up correctly.
apiVersion: extensions/v1beta1
kind: Ingress
metadata:
  name: eks-tutorial-ingress
  namespace: eks-tutorial
  annotations:
    kubernetes.io/ingress.class: alb
    alb.ingress.kubernetes.io/target-type: instance
    alb.ingress.kubernetes.io/scheme: internet-facing
spec:
  rules:
    - http:
        paths:
          - path: /
            backend:
              serviceName: nginx-service
              servicePort: 80
Let’s apply the Ingress resource by running the following command:
kubectl apply -f ingress.yaml -n eks-tutorial

Warning: extensions/v1beta1 Ingress is deprecated in v1.14+, unavailable in v1.22+; use networking.k8s.io/v1 Ingress
ingress.extensions/eks-tutorial-ingress created
Next, let’s check the status of the ingress resource to find out how we can access our service:
Name:             eks-tutorial-ingress
Namespace:        eks-tutorial
Address:          k8s-ekstutor-ekstutor-8c04ab2b17-459214481.us-west-2.elb.amazonaws.com
Default backend:  default-http-backend:80 (<error: endpoints "default-http-backend" not found>)
Rules:
  Host        Path  Backends
  ----        ----  --------
  *
              /   nginx-service:80 (172.31.12.229:80,172.31.3.112:80,172.31.57.7:80)
Annotations:  alb.ingress.kubernetes.io/scheme: internet-facing
              alb.ingress.kubernetes.io/target-type: instance
              kubernetes.io/ingress.class: alb
Events:
  Type    Reason                  Age   From     Message
  ----    ------                  ----  ----     -------
  Normal  SuccessfullyReconciled  4s    ingress  Successfully reconciled
It looks like our ALB was provisioned as expected and our service is available at k8s-ekstutor-ekstutor-8c04ab2b17-459214481.us-west-2.elb.amazonaws.com.
Let’s try to curl this endpoint to make sure things work as expected. Note: it can take a few minutes for the ALB to be fully functional.
curl k8s-ekstutor-ekstutor-8c04ab2b17-459214481.us-west-2.elb.amazonaws.com

<!DOCTYPE html>
<html>
<head>
<title>Welcome to nginx!</title>
<style>
    body {
        width: 35em;
        margin: 0 auto;
        font-family: Tahoma, Verdana, Arial, sans-serif;
    }
</style>
</head>
<body>
<h1>Welcome to nginx!</h1>
<p>If you see this page, the nginx web server is successfully installed and
working. Further configuration is required.</p>

<p>For online documentation and support please refer to
<a href="http://nginx.org/">nginx.org</a>.<br/>
Commercial support is available at
<a href="http://nginx.com/">nginx.com</a>.</p>

<p><em>Thank you for using nginx.</em></p>
</body>
</html>
Congratulations, our Nginx service on EKS is up and running!
Cleaning up the stack
Before finishing up, let’s clean up all the resources we created to ensure we don’t get billed for any of the resources we created. To clean up your stack, run pulumi destroy and then select yes.