How to build and deploy a Python application on EKS using Pulumi
Introduction
In an earlier article, we saw how to bootstrap a new EKS cluster using Python and Pulumi. In this article, we will build upon the EKS cluster and deploy a Python Flask application.
Prerequisites
- A running EKS cluster with AWS Load Balancer Controller
Setup Python web application
For this tutorial, we will set up a simple Python web application which can be found at https://github.com/abhishekray07/python-web-app.
This Python app returns Hello, world! whenever a request is made.
Clone the repo
First, we will clone the sample repo and use that as the application we want to deploy to the EKS cluster. This repository also contains the Kubernetes manifests required for our application.
git clone https://github.com/abhishekray07/python-web-app/
Create a new repo on AWS Elastic Container Registry (ECR)
Next, we will create a new repository to store our Docker images. In the Pulumi file where we created our EKS cluster, we can add the following to create a new ECR repo.
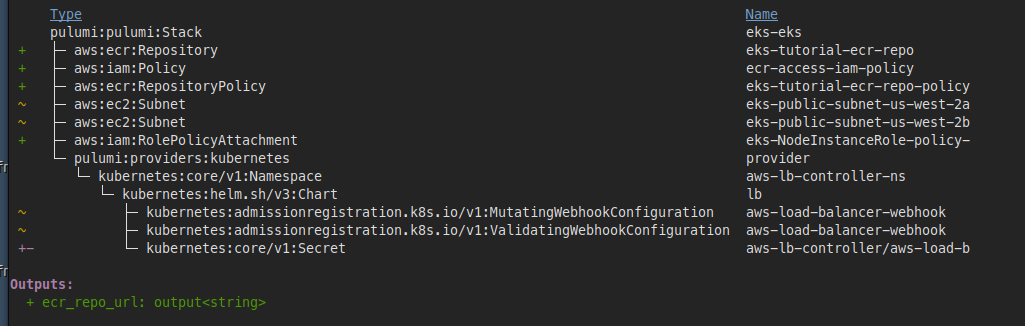
We are creating the following resources:
- A new repo called
eks-tutorial-ecr-repo - An IAM policy to access the repo
- Attaching the IAM policy to the EKS worker nodes
- We also store the repo URL to our stack output so that we can use that in our application manifest
ecr_repo = aws.ecr.Repository("eks-tutorial-ecr-repo")

repo_policy = aws.ecr.RepositoryPolicy(
    "eks-tutorial-ecr-repo-policy",
    policy="""{
        "Version": "2008-10-17",
        "Statement": [
            {
                "Sid": "new policy",
                "Effect": "Allow",
                "Principal": "*",
                "Action": [
                    "ecr:GetDownloadUrlForLayer",
                    "ecr:BatchGetImage",
                    "ecr:BatchCheckLayerAvailability",
                    "ecr:PutImage",
                    "ecr:InitiateLayerUpload",
                    "ecr:UploadLayerPart",
                    "ecr:CompleteLayerUpload",
                    "ecr:DescribeRepositories",
                    "ecr:GetRepositoryPolicy",
                    "ecr:ListImages",
                    "ecr:DeleteRepository",
                    "ecr:BatchDeleteImage",
                    "ecr:SetRepositoryPolicy",
                    "ecr:DeleteRepositoryPolicy"
                ]
            }
        ]
    }""",
    repository=ecr_repo.name
)

ecr_access_policy = aws.iam.Policy(
    "ecr-access-iam-policy",
    policy="""{
      "Version": "2012-10-17",
      "Statement": [
        {
          "Effect": "Allow",
          "Action": [
            "ecr:BatchCheckLayerAvailability",
            "ecr:BatchGetImage",
            "ecr:GetDownloadUrlForLayer",
            "ecr:GetAuthorizationToken"
          ],
          "Resource": "*"
        }
      ]
    }"""
)

nodeInstanceRole = aws.iam.RolePolicyAttachment(
    "eks-NodeInstanceRole-policy-attach",
    role=cluster.instance_roles[0].name,
    policy_arn=ecr_access_policy.arn,
)

pulumi.export("ecr_repo_url", ecr_repo.repository_url)
Next, let’s run pulumi preview to see what changes will be made to our infrastructure.
We can now go ahead and create the repo by running pulumi up. Once the command finishes, the new ECR repo should have been created. We can retrieve the URL by running the following command:
pulumi stack output ecr_repo_url
xxx.dkr.ecr.us-west-2.amazonaws.com/eks-tutorial-ecr-repo-f991f93
Build / Push Docker image
To be able to deploy our application onto Kubernetes, we need to create a Docker image for our application. The python repo has a helper script called build-push-docker.sh that builds and pushed the docker image to the ECR repo.
Before we can use that script, we need to update the ECR repo URL in the script using the following bash command:
sed -i "s/REPLACE_ME/xxxx.dkr.ecr.us-west-2.amazonaws.com\/eks-tutorial-ecr-repo-f991f93/g" build-push-docker.sh
Replace the ECR repo URL with the URL of your own repo and then invoke the script:
./build-push-docker.sh

Login Succeeded
The push refers to repository [xxx.dkr.ecr.us-west-2.amazonaws.com/eks-tutorial-ecr-repo-f991f93]
06795f03e699: Pushed
4ff77643664d: Pushed
8afc6cc250fa: Pushed
4969992dbe82: Pushed
87a873215083: Pushed
55131b45c60c: Pushed
8506f6dcbf82: Pushed
4a36e2652108: Pushed
f9ef7f1bcb19: Pushed
02c055ef67f5: Pushed
latest: digest: sha256:fe88536bfd911e5af0bec2f887b7a42308d3a1ffa84ef8ebc382bfe49369459d size: 24
Deploy Application to EKS Cluster
There are 4 manifest files under the kubernetes folder in the repository linked above. These files are:
Namespace: Creates a new Namespace for our applicationDeployment: Creates a Deployment object for our applicationService: Creates a Service object for our applicationIngress: Creates an ingress for the application so that it is accessible externally
Before we can apply these manifests, we need to update the Deployment manifest to point to the location of our docker image. Run the following command and add in your ECR repo URL:
sed -i "s/REPLACE_ME/xxx.dkr.ecr.us-west-2.amazonaws.com\/eks-tutorial-ecr-repo-f991f93:latest/g" kubernetes/deployment.yaml
We can now apply these manifests to create the Kuberntes resources.
kubectl apply -f namespace.yaml
kubectl get ns

NAME                STATUS   AGE
aws-lb-controller   Active   37h
default             Active   37h
kube-node-lease     Active   37h
kube-public         Active   37h
kube-system         Active   37h
python-web          Active   14s
Then, we create a service for our application:
kubectl apply -f service.yaml
kubectl get svc -n python-web

NAME TYPE CLUSTER-IP EXTERNAL-IP PORT(S) AGE
python-web NodePort 10.100.67.103 <none> 80:32026/TCP 9s
Next, we will create the deployment for the application:
kubectl apply -f deployment.yaml
The pod will initially be Pending and will eventually become Ready if everything is set up successfully.
kubectl get pods -n python-web

NAME READY STATUS RESTARTS AGE
python-web-5744b776c5-2xrvw 0/1 Pending 0 9s
kubectl get pods -n python-web

NAME READY STATUS RESTARTS AGE
python-web-5744b776c5-2xrvw 1/1 Running 0 94s
Lastly, we will apply the ingress manifest to expose our application to the public internet.
kubectl apply -f kubernetes/ingress.yaml -n python-web
To check the status of the ingress, we can run the following command. Note the Address in the output since this is the public URL for our application.
kubectl describe ing -n python-web python-web


Name:             python-web
Namespace:        python-web
Address:          k8s-pythonwe-pythonwe-f008f8de3b-250225160.us-west-2.elb.amazonaws.com
Default backend:  default-http-backend:80 (<error: endpoints "default-http-backend" not found>)
Rules:
  Host        Path  Backends
  ----        ----  --------
  *
              /   python-web:80 (172.31.57.7:8080)
Annotations:  alb.ingress.kubernetes.io/scheme: internet-facing
              alb.ingress.kubernetes.io/target-type: ip
              kubernetes.io/ingress.class: alb
Events:
  Type    Reason                  Age   From     Message
  ----    ------                  ----  ----     -------
  Normal  SuccessfullyReconciled  1s    ingress  Successfully reconciled
The ALB can take a few minutes to be provisioned. Once it is functional, we should be able to access it by hitting the endpoint:
curl http://k8s-pythonwe-pythonwe-f008f8de3b-250225160.us-west-2.elb.amazonaws.com

Hello, World!
Congrats, your web application is up and running on Kubernetes.
Cleaning up the stack
Before finishing up, let’s clean up all the resources we created to ensure we don’t get billed for any of the resources we created. To clean up your stack, run pulumi destroy and then select yes.