How to use Pulumi and Python to create an EC2 instance

Introduction
Pulumi is an Infrastructure as code platform that lets you create, deploy and manage AWS resources using a programming language like Python. Pulumi supports multiple cloud providers as well multiple different programming languages.
Pulumi is similar to Terraform which is also a popular Infrastructure-as-code platform. A major difference between Pulumi and Terraform is that Pulumi lets you choose one of the support general-purpose programming languages whereas Terraform has a domain-specific language called Hashicorp Configuration Language (HCL).
Pulumi is an open-source tool and it provides both free and paid tiers based on usage. For this tutorial, we will be using the Community version which is free for individual use.
Getting started
Pulumi backend
Pulumi manages the state of your infrastructure and stores it in a state file (a JSON file). Pulumi uses this file as the source of truth when it comes to your infrastructure. The state file tells Pulumi when and how to create, delete, or update any cloud resources.
Pulumi provides the capability to store the state in a backend of your choosing. Some of the commonly used options are:
- Pulumi backend is free for individual users and provides an easy-to-use and intuitive UI for managing the state of your infrastructure
- Object stores like AWS S3
By default, Pulumi stores this file in its backend service which is what we will use for this tutorial.
Project Setup
Create a new application
We can create a new python application by running pulumi new aws-python. You will be prompted to enter the name of the project along with some information.
pulumi new aws-python

This command will walk you through creating a new Pulumi project.

Enter a value or leave blank to accept the (default), and press <ENTER>.
Press ^C at any time to quit.

project name: (pulumi-tutorial)
project description: (A minimal AWS Python Pulumi program) Setting up an EC2 instance using Pulumi
Created project 'pulumi-tutorial'

Please enter your desired stack name.
To create a stack in an organization, use the format <org-name>/<stack-name> (e.g. `acmecorp/dev`).
stack name: (dev)
Created stack 'dev'

aws:region: The AWS region to deploy into: (us-east-1) us-west-2
Saved config
Preview infrastructure
We can run pulumi preview to confirm the initial setup worked correctly.
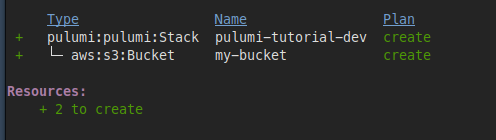
As we can see from the image above, the default stack generated by Pulumi creates an S3 bucket named my-bucket.
Creating an EC2 using Python
Let’s clear up the existing contents of __main__.py and start with the following imports.
from pulumi import export
import pulumi_aws as aws
We will first create a new VPC along with an Internet Gateway and Route Table for our EC2 instance:
vpc = aws.ec2.Vpc(
	"ec2-vpc",
	cidr_block="10.0.0.0/16"
)

public_subnet = aws.ec2.Subnet(
	"ec2-public-subnet",
	cidr_block="10.0.101.0/24",
	tags={
		"Name": "ec2-public"
	},
	vpc_id=vpc.id
)

igw = aws.ec2.InternetGateway(
	"ec2-igw",
	vpc_id=vpc.id,
)

route_table = aws.ec2.RouteTable(
	"ec2-route-table",
	vpc_id=vpc.id,
	routes=[
		{
			"cidr_block": "0.0.0.0/0",
			"gateway_id": igw.id
		}
	]
)

rt_assoc = aws.ec2.RouteTableAssociation(
	"ec2-rta",
	route_table_id=route_table.id,
	subnet_id=public_subnet.id
)
Next, we will create a security group for the EC2 instance that allows HTTP traffic to port 80. This is where we will run the HTTP webserver.
sg = aws.ec2.SecurityGroup(
	"ec2-http-sg",
	description="Allow HTTP traffic to EC2 instance",
	ingress=[{
		"protocol": "tcp",
		"from_port": 80,
		"to_port": 80,
		"cidr_blocks": ["0.0.0.0/0"],
	}],
    vpc_id=vpc.id,
)
Lastly, we will use an Amazon AMI for our EC2 instance along with a custom user data script that will run a HTTP server on port 80.
ami = aws.ec2.get_ami(
	most_recent="true",
	owners=["amazon"],
	filters=[{"name": "name", "values": ["amzn-ami-hvm-*"]}]
)


user_data = """
#!/bin/bash
echo "Hello, world!" > index.html
nohup python -m SimpleHTTPServer 80 &
"""

ec2_instance = aws.ec2.Instance(
	"ec2-tutorial",
	instance_type="t2.micro",
	vpc_security_group_ids=[sg.id],
	ami=ami.id,
	user_data=user_data,
    subnet_id=public_subnet.id,
    associate_public_ip_address=True,
)
We will also export the public IP of our newly created EC2 instance so that we access the webserver at this IP address
export("ec2-public-ip", ec2_instance.public_ip)
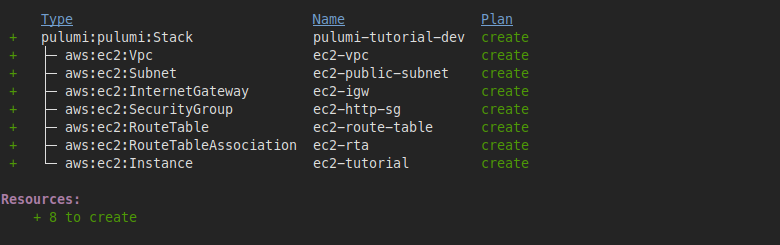
Creating the infrastructure resources
Now that we have the code to set up our EC2 instance, let’s run pulumi preview to see which resources will be created. This is what the output should look like:
Next, we will create our EC2 instance by running pulumi up. Select yes when prompted. Once all the resources are created, you should be able to see the public IP of the EC2 instance that was created.
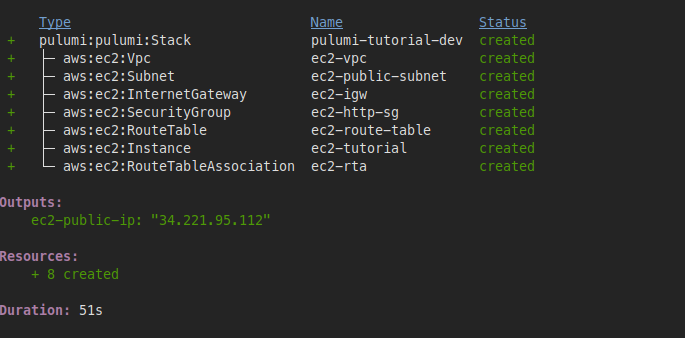
Let’s verify that our EC2 instance is serving HTTP traffic by navigating to the public IP. The webserver should return Hello, World! indicating that everything was set up as expected.
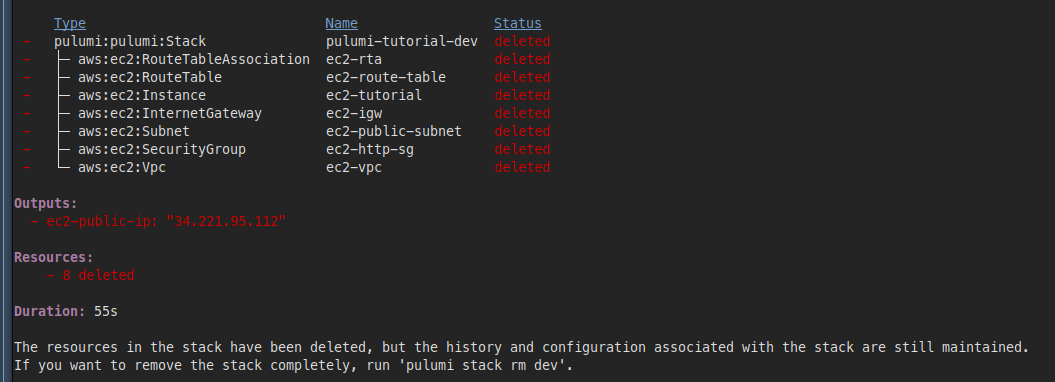
Cleaning up the stack
Before finishing up, let’s clean up all the resources we created to ensure we don’t get billed for any of the resources we created. To clean up your stack, run pulumi destroy and then select yes. Once the deletion is successful, you should see output like this: